WordPressは世界で最も利用されているブログソフトですが、その反面攻撃されやすいと言われています。
All In One WP Security & Firewallはセキュリティ対策を総合的に実装できるプラグインです。
かなり多機能で「ちょっとやりすぎかな、、」というくらいがっつりセキュリティ対策できるのですが、ここでは初心者向けに簡単な設定方法を紹介します。
All In One WP Security & Firewallで出来ること
セキュリティ対策を総合的に実装できるAll In One WP Security & Firewall。
今回紹介するのは主に以下のとおり、不正アクセスや不正ログインを防ぐための設定です。
- WPのバージョン情報を消す
- ログイン試行回数を制限
- ログイン認証を追加
- 不正アクセスやウイルスを防ぐシステムを導入
他にもここでは紹介しませんが、管理画面のURLを変更したり、ファイルを監視して不自然な変更を検出したりすることもできます。
同じくセキュリティ系のプラグインではWordfence Securityも有名ですが、エラーが発生しやすく設定もややこしいと個人的には思いましたので、初心者にはAll In One WP Security & Firewallをおすすめします。
All In One WP Security & Firewallをインストールする
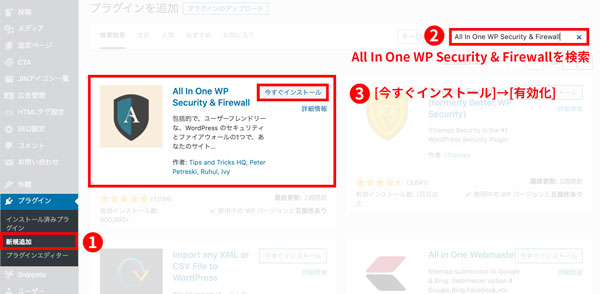
ワードプレス管理画面メニューから
- プラグイン[新規追加]
- 検索窓に「All In One WP Security & Firewall」と入力
- All In One WP Security & Firewallを[今すぐインストール]→[有効化]をクリック
All In One WP Security & Firewallの設定方法
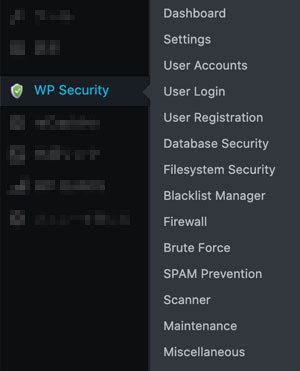
All in one WP Security & Firewallをインストールするとワードプレス管理画面のメニューにWP Securityが追加されます。
WordPressのバージョン情報を消す
サイトで利用しているワードプレスのバージョンを外部から確認できなくする設定を行います。
バージョン情報からサイトにどのような脆弱性があるかを推測されにくくするためです。
 umi
umiバージョン無視して、突破するまであらゆる攻撃を自動で仕掛けてきそうなものですが、設定しておくといくぶんか安心です。
メニュー[WP Security]から[Settings]の画面に進み、[WP Version Info]タブを開きます
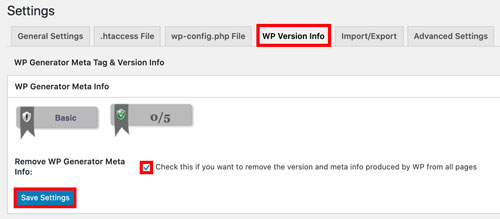
Remove WP Generator Meta Infoにチェックを入れます。
最後に[Save Settings]のクリックを忘れずに。
ログイン制限を設定する
何度もログインを試みるIPアドレスに対してログインを禁止することができます。
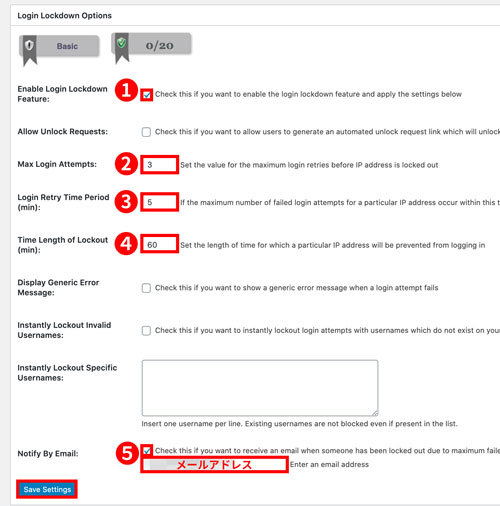
- Enable Login Lockdown Feature(ログイン制限設定を有効化):
チェックします。 - Max Login Attempt(最大ログイン試行回数):
誤ったログイン情報での試行回数を制限します。
デフォルトの3回でOK - Login Retry Time Period(ログイン再試行間隔):
連続してログイン試行したとみなす時間の設定です。
デフォルトの5分でOK。
②と合わせて5分間に3回ログインに失敗すると、ログイン禁止になります。 - Time Length of Lockout(ログイン禁止時間):
デフォルトの60分でOK。
ログイン禁止されたIPアドレスは60分間ログインを試せなくなります。 - Notify by Email(メール通知):
誰かがログイン禁止になると、メールで通知されます。
チェックして任意のメールアドレスを入力します。
Instantly Lockout Invalid Usernamesにチェックを入れると、
存在しないユーザーネームの入力一発でログイン禁止になりますが
自分でも間違えることもあるかなと思うのでチェックしないでおきます。
お好みでどうぞ。
ファイアウォールの設定
ファイアウォールとは不正アクセスやウイルスを防ぐシステムです。
基本のファイアウォールと、6Gファイアウォールの2つを有効化します。
Basic Firewall Rules(基本のファイアウォール)
WP Securityメニューから[Firewall]を選択し、Basic Firewall Rulesタブを開きます。

Enable Basic Firewall Protection(ファイアウォールの基本機能)にチェックして有効化します。
ページ下の保存ボタンを忘れずに!
6G Blacklist Firewall Rules(6Gファイアフォール)
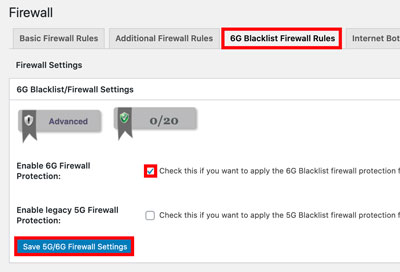
Firewallのページでタブを[6G Blacklist Firewall Rules]に変えます。
Enable 6G Firewall Protectionにチェックを入れて、保存します。
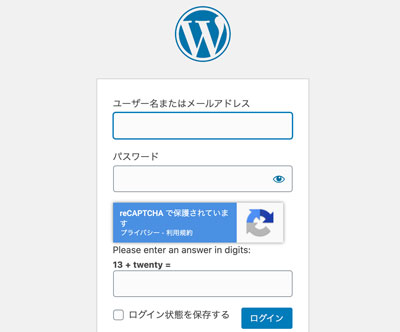
認証を追加する
ログインページには通常IDとパスワードの入力と、
reCaptchaを導入している場合にはreCaptchaによる認証があります。
それらに加えてさらに「簡単な計算」による認証を追加することができます。
以下の画像のようになります。
メニューから[Brute Force]を選択し、
[Login Captcha]タブを開きます。
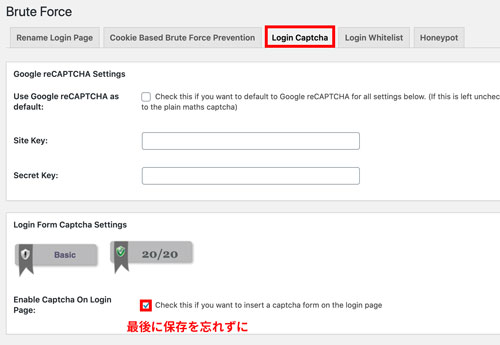
Login Form Captcha Settingsの
Enable Captcha On Login Pageにチェックを入れて保存します。
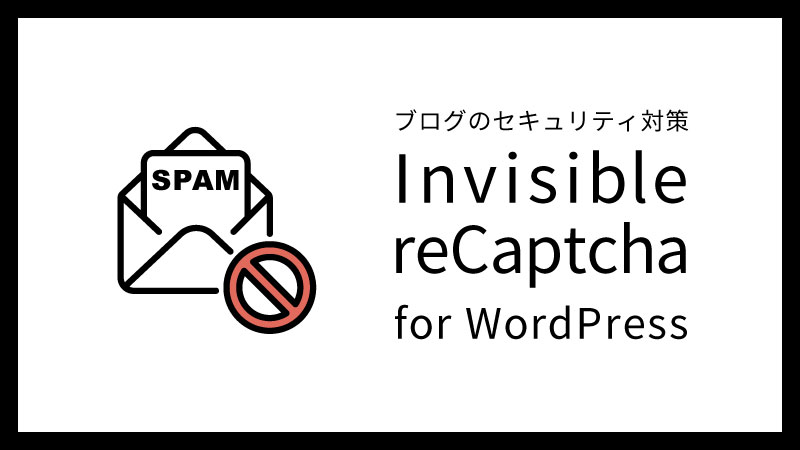
その上にGoogle reCaptchaの設定ができる箇所があるのですが、
現時点でこのプラグインで使えるのは一世代古いv2。
Invisible reCaptchaでの設定をおすすめします。
これで基本の設定は完了です!
以降、場合によってはかなり優秀な機能をいくつか紹介します。
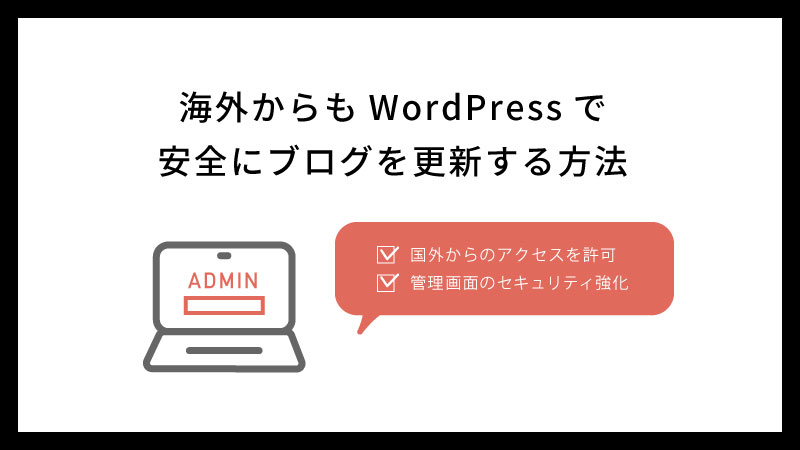
海外でもWordPressを更新するなら使いたい機能
国内のサーバーを利用されている場合、海外からの管理画面のアクセスができなかったりします。
制限の解除は手動で出来ますが、そうするとセキュリティが弱くなります。
そんな時は管理画面のURLを変更するのが有効です。
国内だけの利用や短期間の海外利用をされるくらいであれば、
普段はサーバー側で海外IPアドレスからのアクセスを制限しておいて
必要なときだけ解除するでも十分だと思います。
気になる方は設定しておくと、より安心ではあります。
設定方法は以下の記事をご覧ください。
便利かもしれないその他の機能
ここからはAll in one WP Security & Firewallで設定しておくと、場合によっては便利な機能を紹介します。
自動ログアウト時間を変更する
WordPressでは管理画面にログインする際、「ログイン状態を保存する」にチェックを入れるとデフォルトで14日間セッションが保たれます。
All in one WP Security & Firewallではこの自動ログアウトの時間を変更することができます。
複数人でサイトを管理している場合には設定しておいたほうがよいですね。
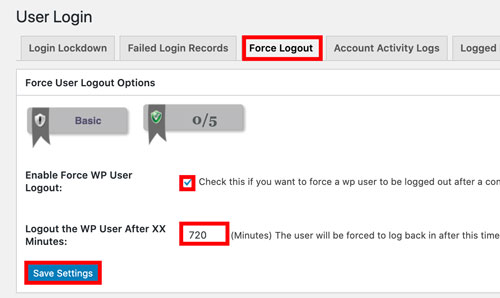
- [User Login]の[Force Logout]タブを開きます。
- Enable Force WP User Logout(自動ログアウト有効化):
チェックします。 - Logout the WP User After XX Minutes(XX分後にログアウト):
任意の数字を入れます。ここでは12時間として720分にします。
コンテンツの盗用・コピー防止
セキュリティには関係ありませんが、なぜかAll in one WP Security & Firewallにはコピー防止機能がついています。
管理者以外のユーザーの以下の操作を無効にすることができます。
- 右クリック
- テキスト選択
- コピー
一般ユーザーの使い勝手を損なう可能性もありますが、
トレンドアフィリエイトなどコピーされやすい分野のブログでは有効にすることをおすすめします。
Firewallメニューの[Miscellaneous]ページから設定します。
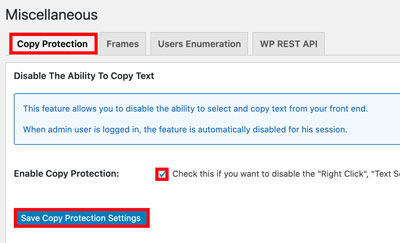
[Copy Protection]タブを開き、
Enable Copy Protectionにチェックを入れます。
保存して完了!